
VirtualBox is a cross-platform virtualization application. What does that mean? For one thing, it installs on your existing Intel or AMD-based computers, whether they are running Windows, Mac, Linux or Solaris operating systems. Secondly, it extends the capabilities of your existing computer so that it can run multiple operating systems (inside multiple virtual machines) at the same time. So, for example, you can run Windows and Linux on your Mac, run Windows Server 2008 on your Linux server, run Linux on your Windows PC, and so on, all alongside your existing applications. You can install and run as many virtual machines as you like -- the only practical limits are disk space and memory.
VirtualBox is deceptively simple yet also very powerful. It can run everywhere from small embedded systems or desktop class machines all the way up to datacenter deployments and even Cloud environments.
In this User Manual, we'll begin simply with a quick introduction to virtualization and how to get your first virtual machine running with the easy-to-use VirtualBox graphical user interface.
You Can Run Your Desired OS using Oracle VM VirtualBox But We will show You how to Use Windows XP Within VirtualBox.
Setting up a virtual machine isn’t very complicated, but it does involve a number of steps. Don’t worry—we’ll walk you through them, one at a time.
Before we can begin, you’ll need to make sure you have the following two things:
VirtualBox: Other virtual machine programs are out there, but this one has a lot going for it—it’s got all the features you need, it’s easy to set up and use, and (best of all) it’s totally free for personal use. You can Download it with extension pack at Here.

Windows XP Installation File/Data (.iso or CD/DVD): In order to install windows on your new virtual machine, you’ll need your Windows XP installation disc (You can choose you desired one), or a downloaded Windows XP Lite.ISO file with the data that comes on that disc from Here.
1# If you’ve got all of the above, start by installing VirtualBox. There’s a few choices you can make during the installation, but you can just leave the default options selected for everything and click through. When the installer is done, VirtualBox will start up, and you’ll see a message informing you that you don’t have any virtual machine created yet. To remedy that, click on the New (blue) button in the top left corner.
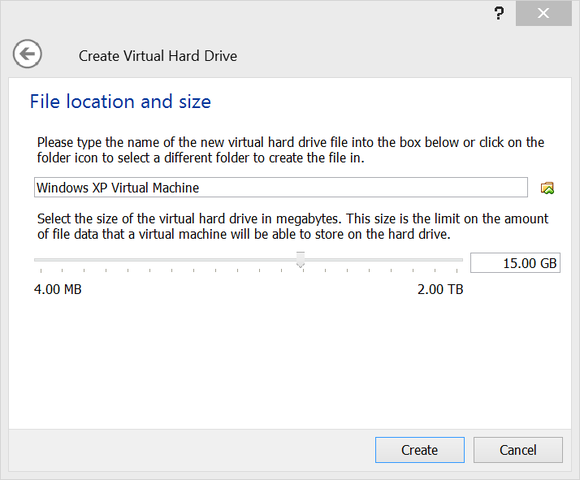
You’ll now go through several pages of setup for your new virtual machine. On the first page, choose a descriptive name (such as “Windows XP Virtual Machine”) and select what make and model of operating system you’re going to install. Conveniently, Windows XP is the default choice, so unless your drop-down menu looks different, stick with that (here you have to choose your Operating System which you are going to install in this guide we choose windows xp 32bit lite.iso).

2# The second setup page asks you how much of your system memory you want to devote to the virtual machine while it’s running. Windows XP’s memory requirements are very low, but for better performance you’ll want to increase this higher than the recommended 192 MB. Depending on how much memory you have to spare, you can allocate from 512MB to 2GB. (You can use different value for different operating systems e.g. for windows 7 use 2GB-4GB) Click Next.

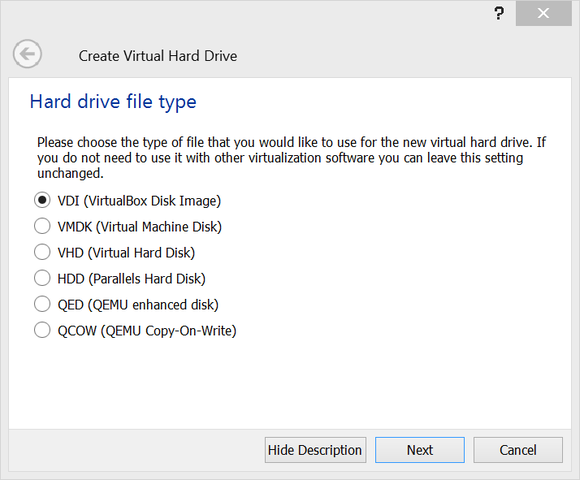
3# On the next page, leave “Create a virtual hard drive now” selected and click Create. A new setup window will open, with choices about virtual hard drive files. Leave the default “VDI” option selected, and click Next. On the following page, choose Dynamically allocated, which means that you can allocate, Because if you use 25GB of hard drive space for the virtual machine, but that space won’t actually be used up on your physical hard disk unless you actually use it for something in the virtual machine. Click Next again.
4# You’ll now be asked to pick the size of the drive. 10GB is enough to install the operating system with room to spare, but you should increase it a bit if you plan to install anything more than basic software. We are using 15GB for our Windows XP 32bit Lite (You can use different value for you different OS). Remember that you won’t be immediately forfeiting all this space on your main drive—it’ll only be claimed if you actually use it for something in your virtual Windows XP PC. Click Create.
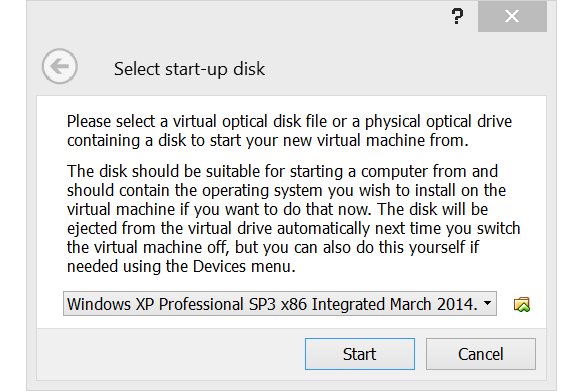
5# Now, your virtual machine is ready to go. But just as if you’d built a brand new physical PC, you have to install an operating system on it. If you attempt to run the PC by double clicking on its tile on the left part of the screen, VirtualBox will automatically start the new machine wizard, and it will ask you to select a startup disc. You can click the little file icon next to the file field to browse your system for the Windows install data. If you have a physical disc, put it in your CD or DVD drive and select that drive. If you have an ISO, simply select that file. (We are using Window XP 32bit ISO image)
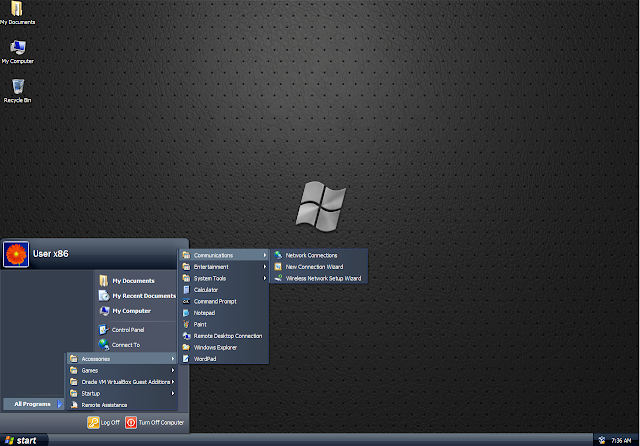
6# Your virtual machine will start up, and you will see the familiar Windows installation process (Or With Respect to Your OS). Even if you’ve never installed Windows XP before, the installation process is very straightforward—just click through each screen, filling in any of the basic info it asks you for. It will restart at one point in the process, and then after several minutes of installing you’ll find yourself looking at a small version of the Windows XP desktop, in a window. (May Different for Different OS)
7# Before you can start using your virtual Windows XP machine (Or any other OS), there’s one more step to complete. VirtualBox includes a set of software utilities to install on the virtual PC, which make it a lot easier to work with and control the virtual PC. To install these, click on the VirtualBox menu bar (On the Top) item labelled Devices, then select Insert Guest Additions CD Image.


A new wizard will pop up, this time inside the Windows XP virtual machine. There aren’t any complicated decisions to make here, just click next a couple times, and allow the computer to restart when it asks.

8# With Guest Additions installed you will have a number of new options available to you in the “Devices” menu of VirtualBox. Most useful is the option to add a shared folder, which will allow you to easily transfer files from your host computer to your virtual computer. To do this, click Devices, then Shared Folders Settings, which will open the virtual machine settings.
On the right side of the window there’s a small icon of a folder with a green plus. Click this, then select a file location to use as a folder. Make sure to click the boxes marked “Auto-mount” and “Make Permanent.” If you only plan to transfer files to the virtual machine and not from it, click “Read-only” as well. VirtualBox can be a little finicky with what it accepts as a valid file name here—we found the easiest way to make sure the folder path works is to manually create a folder with no spaces or special characters on the host machine, then copy and paste the address into the folder field.

9# Now, restart your virtual machine, and when it starts again you’ll see your shared folder as a drive on the virtual machine. You can use this to transfer software to the virtual machine, and then install it inside Windows XP. (Or your Desired OS)
Download Oracle VM VirtualBox With Extension Pack Installer from Here.
Note:-
This is a Basic Guide for Installing Windows XP in VM VirtualBox but You Can use it to install any OS in VirtualBox. But if You Want to learn about installing more OS on VirtualBox You Can learn more by visiting the Virtual Box Official Website Here
Facing Any Issue:-
If You Facing any issue please let me know by click bottom right side LIVE CHAT BOX.
Nhận xét
Đăng nhận xét